
0 Comments
Spellbinders February 2020 | 10 cards 1 kit
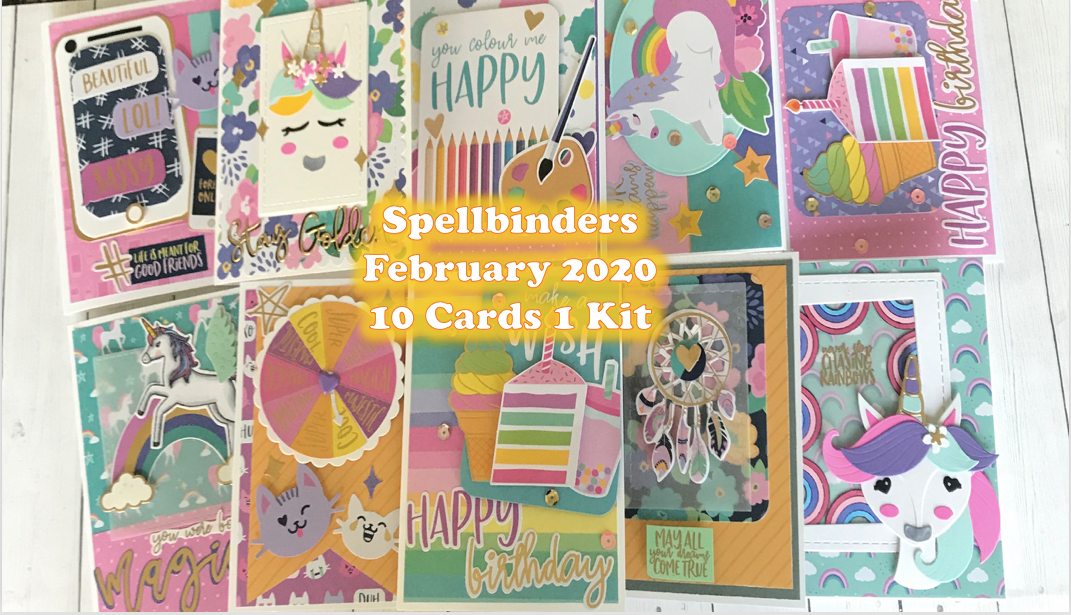
Hi everyone! Today I'm featuring 10 cards that I made with the Spellbinders February 2020 card kit. I loved the unicorn and rainbow theme of this kit. I created many different cards including Birthday, encouragement and thinking of you. The kit had a lovely rainbow color scheme and the die in the kit was a fun unicorn. I used the pattern papers, colored card-stock, ephemera pieces, die cuts, sequins, stickers and the stamp set to create all of my cards today. In total, I made 13 cards in one day using this kit. However, I'm sure I can make many more. I cut my colored card-stock to be mattes for my cards. I also used them for die cutting the unicorn. For all my coloring, I used copic markers. Lastly, I created all my card bases with 110 lb white Nina card-stock. I hope I was able to inspire those of you who received the kit. Let me know which card is your favorite down below!
Card One


Upon opening the February kit, I was most excited to work with the unicorn head die cut. For my unicorn, I decided to make her mane the colors in my background pattern paper. Beside her, is a white stitched rectangle frame. Behind the frame I glued several rainbows from the stamp set. I too colored them like the background paper. To mute the background paper, I added vellum behind my white frame. On top of the vellum, I gold heat embossed the sentiment "never stop chasing rainbows".
Card Two


This maybe the fastest card I've ever made with a Spellbinders card kit. As you can see, this card is entirely made with the ephemera pieces and pattern paper. I embellished the "you color me happy" project life card with a few gold heart and star stickers. The paints on the pallet were accented with glossy accents to make them look shiny.
Card Three


Continuing on the unicorn and rainbow theme, I decided to pair a large rainbow ephemera piece with a stamped and colored unicorn. To accent the rainbow, I added a cloud on either end. I used the cloud stickers for this. For one of my cards, I also added some wings from another sticker to my unicorn. I glued both the rainbow and unicorn to a vellum stitched square. Again, the vellum was there just to mute down the busy background. I added a scrap strip of pink to the bottom, along with a skinny strip of gold card-stock. The sentiments are slightly different, but each gold heat embossed. One says "You were born to sparkle", and the other says "you were born magical" I paired the magical die cut word with the gold heat embossed sentiment just to create another fun sentiment!
Card Four


Woo hoo! Another matching card set. I love that I'm able to create two cards with one design sometimes, since each ephemera piece comes twice in the pack. For this card, I paired the sleeping unicorn and flower cluster together. I glued them both onto an oval and popped it up over my pattern paper card panel. For the sentiments on these cards, I chose some stickers and attached them to the top left of the panel. To finish them, I glued a few sequins around the panel. As you can see, they're not exactly the same, since I switched up the pattern papers and the sentiments. It's just another way to stretch the value of the kit!
Card Five


The dream catcher on this card was one of my favorite pieces from the ephemera pack. I gave it some dimension by fussy cutting the feathers out from the second dream catcher and popping them up onto the first dream catcher. In the center, I added a cut blue and gold heart sticker. I adhered it onto a vellum stitched rectangle. Then, I adhered the vellum panel onto one of the project life note cards. For the sentiment on this card, I gold heat embossed "May all your dreams come true" onto a scrap of mint card-stock. I popped up the sentiment to be the same level as the dream catcher.
Card Six


I was pleased that I was able to create two Birthday cards using this design. I always seem to be running out of Birthday, so I always try to make them when I have the chance. This design is super simple. I started by popping up the cake slice over the same sized cake slice on the project life "make a wish" card. Beside the cake, I adhered an ice cream and milkshake ephemera piece. I popped up the card for dimension and glued a "Happy Birthday" die cut sentiment below it. As a final embellishment, I decided to scatter a few sequins around the card. For my second card, I used the same design, but in a horizontal format instead.
Card Seven


Lately, these deconstructed unicorn faces have been really popular for unicorn themed Birthday invitations. I thought I would create one using the dies that came in the die set. I basically assembled the unicorn the exact same way, except I just left out the unicorns head, neck and snout. I absolutely love how this turned out, especially the unicorns horn which was die cut from gold card-stock and layered on top of silver glitter card-stock! The face of the unicorn was glued onto a white stitched rectangle and then popped up over a scalloped stitched rectangle which I die cut from some pattern paper. Because the pattern paper is so busy, I decided to layer a black layer behind my gold "stay golden" sentiment. Instead of sequins, I opted to finish the card off with a few die cut gold stars.
Card Eight


Beep Beep! The phone on the card is ringing from text messages that say "beautiful, LOL! and sassy. Believe it or not, but I created that entire phone from scratch without a single die cut! I used the small ephemera phone as a reference to create my own larger one. The gold outer layer was cut to 2.25 x 4 in. The white layer on top was cut an eight of an inch smaller on the top and bottom. The "screen" of the phone was cut from pattern paper to 2 x 3.5 in. To create the home button, I used two circle punches in my stash. I cut the gold outer circle from a .5 in circle punch and the white one from a .25 in circle punch. I freehand cut a black skinny strip for the top of the phone. The camera lense was made with another .25 in circle punched from black card-stock. I collaged a few things around my phone to create an awesome teenage themed "Texting" card.
Card Nine


Now, I might have cheated with this kit. I technically only made 9 card designs, thinking I made 10. By the time I realized I only had 9, I had already put away my supplies. Oh wellll! My final card was really simple and quick to put together. All I did was layer a large yellow striped banner over a pattern paper card panel. I love how some of the pattern papers match the ephemera pieces! The cats on the background paper match my die cut cat faces which I adhered to the bottom of the banner. Above the cats is a sentiment wheel, which I created by gluing two of the ephemera half circle pieces together to create a whole circle. To help it stand out against the busy pattern paper, I added a white scalloped circle behind. I also added a heart brad and an arrow to the center of the wheel to make it look like the arrow was spinning. However, I made my brad to tight so it doesn't actually spin. The card was further embellished with a few die cut stars.
Video