
0 Comments
Fairy Shadow Box
Hi everyone I am back today sharing another post for Scrappy Tails Crafts using some of the new products from the June release, which was full of fairy-licious goodness and magical fun. Now wave the fairy wand and let's see what I created!

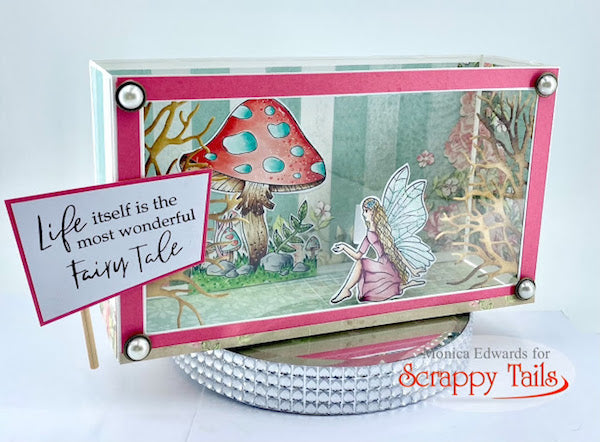
To create this card, start by assembling your shadow box using the Scrappy Tails Crafts "Slimline Shadow Box" die set. To see how to build the shadow box, check out Sabrina's video tutorial HERE. Next, die cut the front, back and two side panels from pattern paper to decorate your box. For my box, I created a bottom by simply adding another piece of white card stock with pattern paper glued on top. You don't have to do this, but I was just going for a certain look.

Cover all the pieces of your Shadow Box using the patterned paper. I even cut thin pink strips to cover the font. Once done, take a piece of acetate and cover your box opening so you have a nice enclosed box. I happen to love acetate so any chance I have to use it, I go for it!
To decorate the inside of my box, I diecut the Forest Tree cover plate and cut it in half. I blended the trees with some brown distress ink to color them. Then, I used spray adhesive to adhere the trees to the acetate front.
Then, I stamped and copic colored a few images from the Scrappy Tails "Fairy Friends" 6x8 stamp set.
Here are my Copic combinations:
-
Fairy Dress; RV32, RV34 and R56
-
Mushrooms: BG10, BG11, BG15, BG18, R20, R22, R24, R27, E30, E33, E39, E29
-
Grass: YG06, YG09
-
Rocks: C2, C3, C5

Once I was done coloring, I used my stickles to add some fairy dust to her wings (a fairy must have fairy dust right?!). To stand my fairy and mushroom upright, I created little paper boxes for them to lean on. I hope everyone enjoyed my post and thanks so much for stopping by!
Follow Monica on Social Media!