
0 Comments
DIY St. Patricks Day Sign
Hello friends! Boy, do I have a project to share with you today! Today, I am stretching my Valentine’s Day stash into the next season… St Patrick’s Day! You probably don’t know this about me, but St. Pattie's day is my very favorite holiday of the year! Anyhow, my project today features some Scrappy Tails Crafts products with a few Dollar Tree hacks mixed in. Let’s get into it…
VIDEO TUTORIAL
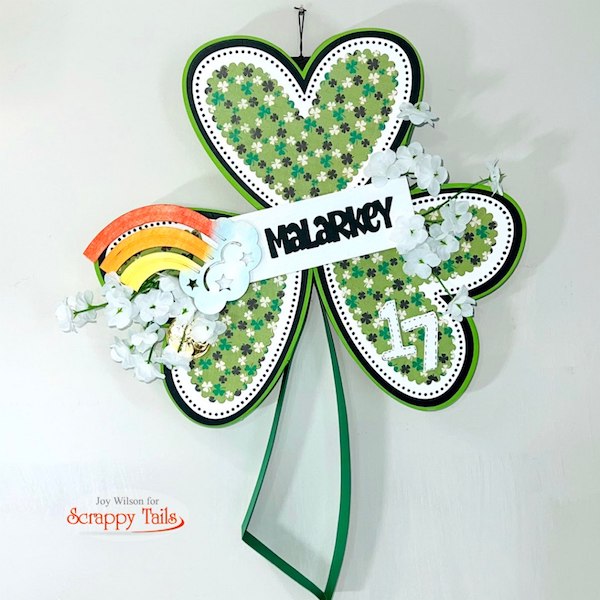
This project features the Scrappy Tails Chocolate Heart Gift Box die set. You would never know it, because I transformed the box into a 3D wall decor piece for St. Patrick’s Day!
To create the base of the shamrock, I created 3 box lids using the Chocolate Heart Gift Box die set. I only created the lids of the boxes since you won't see the back side of this decor piece. If you want the clover to be more substantial you can create the full boxes. To see how they're made, check out my video tutorial above.
I used hot glue to adhere all three heart shapes together creating the clover shape. Then, I cut two 1x11" strips to form the stem. I just scored one end and glued the second strip to the tab. I wanted the stem to be curved so I used hot glue and adhered part of the stem down one side of the clover creating the curve and a shorter left side. I wedged and hot glued the stem between two of the clover leaves at the top.

I cut the smaller heart from the same chocolate box die set three times from black card stock and adhered each one to my green heart box lids
The matting layers were die cut with different sized hearts from the Scalloped Heart Add on die set. I just love all of the detail in these nesting dies.
Once I had the Shamrock finished, I used some Dollar Tree chip board pieces to decorate it with. The rainbow, was a faux votive candle holder that I tore apart carefully and inked up with white pigment ink and Distress Oxide inks in the colors Candied Apple, Carved Pumpkin, Squeezed Lemonade, and Tumbled Glass.
I also found an unfinished wood sign that I painted with white chalk paint, as well as some wooden number cut outs. Once dry, I added a "Malarkey" word die cut from my stash to the sign. The scariest part was cutting the rainbow in half, but I think it would have been too big for this project otherwise. After gluing my sign and rainbow, I tucked some white flowers and a gold coin as a finishing touch.
I cannot tell you how much fun this was to create. My husband has already asked if I will make one for his office!
For more inspiration please join us on the Scrappy Tails Crafts Facebook page! You will find stunning projects on the Scrappy Tails blog, Youtube, and on Instagram!